| Kitchen Measurement Conversion Tables | |||
| Liquid or Volume Measures (approximate) | |||
| 1 teaspoon | 1/3 tablespoon | 5 ml | |
| 1 tablespoon | 1/2 fluid ounce | 3 teaspoons | 15 ml 15 cc |
| 2 tablespoons | 1 fluid ounce | 1/8 cup, 6 teaspoons | 30 ml, 30 cc |
| 1/4 cup | 2 fluid ounces | 4 tablespoons | 59 ml |
| 1/3 cup | 2 2/3 fluid ounces | 5 tablespoons & 1 teaspoon | 79 ml |
| 1/2 cup | 4 fluid ounces | 8 tablespoons | 118 ml |
| 2/3 cup | 5 1/3 fluid ounces | 10 tablespoons & 2 teaspoons | 158 ml |
| 3/4 cup | 6 fluid ounces | 12 tablespoons | 177 ml |
| 7/8 cup | 7 fluid ounces | 14 tablespoons | 207 ml |
| 1 cup | 8 fluid ounces/ 1/2 pint | 16 tablespoons | 237 ml |
| 2 cups | 16 fluid ounces/ 1 pint | 32 tablespoons | 473 ml |
| 4 cups | 32 fluid ounces | 1 quart | 946 ml |
| 1 pint | 16 fluid ounces/ 1 pint | 32 tablespoons | 473 ml |
| 2 pints | 32 fluid ounces | 1 quart | 946 ml 0.946 liters |
| 8 pints | 1 gallon/ 128 fluid ounces | 4 quarts | 3785 ml 3.78 liters |
| 4 quarts | 1 gallon/128 fluid ounces | 1 gallon | 3785 ml 3.78 liters |
| 1 liter | 1.057 quarts | 1000 ml | |
| 1 gallon | 4 quarts | 128 fluid ounces | 3785 ml 3.78 liters |
| Dry Or Weight Measurements (approximate) | |||
| 1 ounce | 30 grams (28.35 g) | ||
| 2 ounces | 55 grams | ||
| 3 ounces | 85 grams | ||
| 4 ounces | 1/4 pound | 125 grams | |
| 8 ounces | 1/2 pound | 240 grams | |
| 12 ounces | 3/4 pound | 375 grams | |
| 16 ounces | 1 pound | 454 grams | |
| 32 ounces | 2 pounds | 907 grams | |
| 1/4 pound | 4 ounces | 125 grams | |
| 1/2 pound | 8 ounces | 240 grams | |
| 3/4 pound | 12 ounces | 375 grams | |
| 1 pound | 16 ounces | 454 grams | |
| 2 pounds | 32 ounces | 907 grams | |
| 1 kilogram | 2.2 pounds/ 35.2 ounces | 1000 gram | |
Thursday, June 20, 2013
Kitchen Measurement Conversion Tables
Sunday, June 9, 2013
4th of July popsicles


A few of my neighbours and I had a cookout on Memorial Day weekend. Of course their kids were also invited :). When my oldest son and I were searching for Summer recipes, we ran into this recipe in a magazine. His eyes got big with excitement and he begged me to make these Popsicles for him. They are awfully cute! Plus, this little treat is low in calories. That's a plus in my book. I decided to use the red, white and blue colors of the American flag to keep in line with the Memorial Day celebrations. I know I'm posting this recipe a few days past Memorial Day, but you can also use this for the 4th of July. See? I'm already thinking ahead :) Here's what you'll need:
EQUIPMENT:
-Wire or silicone whisk.
-3 medium size mixing bowls.
-2 measuring cups (one for hot water, one for cold water)
-Popsicle sticks (can be found in any craft store. I bought mine at Walmart, in the craft aisle).
-5 OZ. Dixie paper cups (You can also clean out the 6OZ. plastic yogurt tubs and use those) set in a rectangular container. This will help keep the cups stable as they set.
-Hand mixer or a balloon whisk if you don't have one.
-A pair of kitchen scissors.


INGREDIENTS:
-1 3 OZ. pack of red gelatin powder.
-1/3 cup of granulated sugar for the red gelatin powder.
-1 cup of boiling water (for dissolving the red gelatin powder)
-1/2 cup of ice-cold water (for dissolving the red gelatin powder).
-1 3 OZ. pack of blue gelatin powder.
-1 cup of boiling water (for dissolving the blue gelatin powder).
-1/2 cup of ice-cold water for dissolving the blue gelatin powder.
-1/3 cup of granulated sugar for the blue gelatin powder.
-4 OZ. of room temperature full-fat cream cheese.
-1 1/2 cups Cool Whip topping thawed.
-1/3 cup granulated sugar.


I decided to put the red jell-o in the bottom of the paper cups, followed by a layer of cream cheese, sugar and cool whip, and then the blue jell-o on the top of the cup. So I started by first mixing the blue jell-o that would be at the top of the cup.
INSTRUCTIONS:
-In one of the mixing bowls, empty the pack of blue jell-o powder.
-Add the boiling water and sugar and whisk until the sugar and jell-o are completely dissolved.
-Add the ice-cold water and whisk until all the ice cubes are dissolved.
-Place the bowl in the freezer for 30 minutes until it is semi-set (the texture should be between jello and liquid. See the picture below).

-In another mixing bowl, empty the pack of red jello-powder.
-Add the hot water and sugar and whisk until the sugar and jell-o particles are completely dissolved.
-Add the ice-cold water and whisk until all the ice-cubes are completely dissolved.
-Pour the mixture into one of the measuring cups (that will make it easier to pour).
-Pour the red jell-o mix into the paper cups (pit a little less than 1/2 cup into each paper cup. See picture below).
-Place the container with the paper cups into the freezer for 45 mins until set (when you touch the top of the red layer with your finger, it should not be wet/watery).

-In a clean mixing bowl, using a hand mixer, cream the room-temperature 4 OZ. of cream cheese and granulated sugar until smooth and creamy (as shown below).

-Slowly add in the thawed whipped topping (use a spatula to fold it in).
-Using a tablespoon, heap some of the cream cheese/whipped topping mixture over top of the red set layer of jell-O, and spread gently till the whole red layer is covered (if your cream cheese and whipped topping were still cold, this will give you a hard time).


-Now use a tablespoon to put the semi-set blue layer of jell-o to the rim of the cup.

-Now insert a Popsicle stick into each of the cups (try and get it to stand straight).
-Once all the Popsicle sticks have been inserted into the cups of jell-o, return the jell-o into the freezer and let set a further 4-12 hours. You can even leave it in there overnight. I let mine set for 12 hours in the freezer.

-Once this time is up, simply snip a small section of the rim of the cup and tear the paper cup away from the jell-o to reveal the bold red, white and blue Popsicles.


Now how easy was that?! Listen to the "oohs" and "ahs" as you unveil your creation. Enjoy!
Saturday, June 8, 2013
Pineapple Upside-Down Cake


An upside-down cake is a cake that is baked in a single pan, then turned over and eaten upside-down. Usually chopped fruits such as apples, pineapples or cherries-and a butter and sugar topping are placed on the bottom of the pan before the batter is poured in, so that they form a decorative topping. The cake is then inverted once it's done cooking, leaving the fruits that were at the bottom of the pan, at the top of the cake (thus the term an upside down cake). This recipe is the American version of an upside-down cake.
I first ate this cake at my now husband's grandmother's house in Cleveland. There was a lady named Catherine who would bake and sell this cake to his grandmother. It was so good, I had to learn how to make it. I have found a recipe for this cake that I love. The cake is full of pineapple flavor and is so moist you could swear you are eating a pineapple cloud when you bite into it.The pineapple and brown sugar mixture caramelize as the cake bakes and adds on to the flavor. The pineapple rings and cherries adorn the cake making it beautiful to look at. Here's what you'll need to make this cake:
EQUIPMENT:
-A 9x13 sheet pan or you can use two 9-inch round baking pans.
-A hand-mixer, a stand mixer or a wire whisk.
-A spatula.
-Large mixing bowl.
-Medium mixing bowl.
-Toothpick or chopstick (to test your cake for doneness).

INGREDIENTS:
-1 stick (8 tablespoons) of unsalted butter.
-1 1/2 cups brown sugar, tightly packed.
-12-13 pineapple rings (about 1 1/2 cans).
-12-13 maraschino cherries,drained (you can find these in the baking aisle of the grocery store)
-2/3 cups unsalted butter at room temperature.
-1 1/3 cups granulated sugar.
-2 teaspoons pure vanilla extract.
-4 large eggs, at room temperature.
-3 1/3 cups all-purpose flour, sifted.
-1/4 teaspoon salt (I use Kosher salt).
-4 teaspoons baking powder (NOT baking soda).
-1 1/3 cups pure pineapple juice (I used the juice that was in the canned pineapples. I used a sieve over a bowl to separate the juice from the pineapples).


INSTRUCTIONS:
-Preheat your oven to 350 degrees Fahrenheit (180 degrees Celsius).
-In your sheet pan or baking pans, add the stick of butter (split it in half if you're using two 9-inch cake pans).
-Add the brown sugar in the pan with the butter. Place in the middle rack of the oven while preparing the cake batter.
-In the large mixing bowl or in the bowl of a stand mixer, place the 2/3 cups unsalted butter and cream it until light and fluffy.
-Gradually add sugar and keep beating until well combined.
-Add the vanilla to the eggs.
-Add the eggs into the large bowl with the butter/sugar one at a time. Beat until light and fluffy.
-In the medium mixing bowl, combine the sifted flour, baking powder and salt with a whisk until well combined.
-Add the flour mixture alternatively with the pineapple juice (as shown in the video) and beat until smooth. Don't panic, the batter should be thick (see picture below). Do not over mix the batter as that will make your cake very dense :(

-Remove the pan with the butter/sugar mixture from the oven. Stir the butter and brown sugar to combine and distribute the mixture evenly in the baking pan.
-Decoratively place the pineapple rings in the baking pan (use my method in the video as an example) over the butter/sugar mixture.
-Place the cherries in the middle of the pineapple rings and anywhere else on the cake you think will make it look pretty.
-Carefully pour the cake batter over the pineapple rings/cherries. Use a spatula to make the layer of cake batter even in the pan.
-Bake the cake in the middle rack of the oven for 35-40 minutes (mine took exactly 35 minutes). The cake is ready when a toothpick inverted in the center of the cake comes out clean or when you touch the center of the cake, it springs back. I always test for doneness of the cake 5 minutes before the minimum cooking time. In this case, check to see if the cake is done 30 minutes into cooking.

-Let the cake sit for 5 minutes on a wire cooling rack and then invert it while its still hot or the sugar at the bottom of the pan will begin to harden. You can use the method I used in the video. Enjoy!

Friday, June 7, 2013
Potato Bhajias


A bhajia is a very popular East African snack that has it's origins in India. It is a kind of fritter, with several variants. In India, they are called, "bhaji". In Kenya, they are usually served with a cold refreshing drink. I would in fact dare say that an ice-cold Coca-Cola and a bhajia are a match made in flavor heaven! This recipe consists of thinly sliced potatoes incorporated into a thick batter made from rice and gram flour (chickpea flour), spices and herbs, then fried until golden. They may be served with a side of salad and slice of lemon, or with mango chutney.
In boarding school, they would be sold at the school canteen sandwiched in a soft bun. Growing up in Kenya, there was a food truck in our subdivision that sold bhajias. That was always a welcome option whenever I stayed out past either lunch or dinner time. In our house, my mother followed very literally the Swahili saying, "Asiyekuwepo, na lake halipo"(loosely translated, the individual who is not present, has no share in whatever is on offer). My Mom was very strict about making it on time for lunch or dinner. In my family, we all knew lunch was served at 12:30pm sharp, and dinner at 8:00pm sharp. So if you were not seated at the table at these times..forget about it! You might as well stop somewhere and grab yourself something quick to eat. So this bhajia food truck was on many occasions a life-saver. I know it sounds harsh, but that was my Mom's way of showing us structure and respect for time through tough love. As my father always said, punctuality is a good indication of one's character :) Anyway, here's how to make these:
EQUIPMENT:
-Sharp knife or mandolin slicer.
-Cutting board.
-Wok or deep frying pan.
-Large mixing bowl.
-Medium mixing bowl.
-Wire whisk.
-Kitchen tongs.
-Skimmer.
-Paper towels.
INGREDIENTS:
-3 cups vegetable oil for frying (I used canola oil).
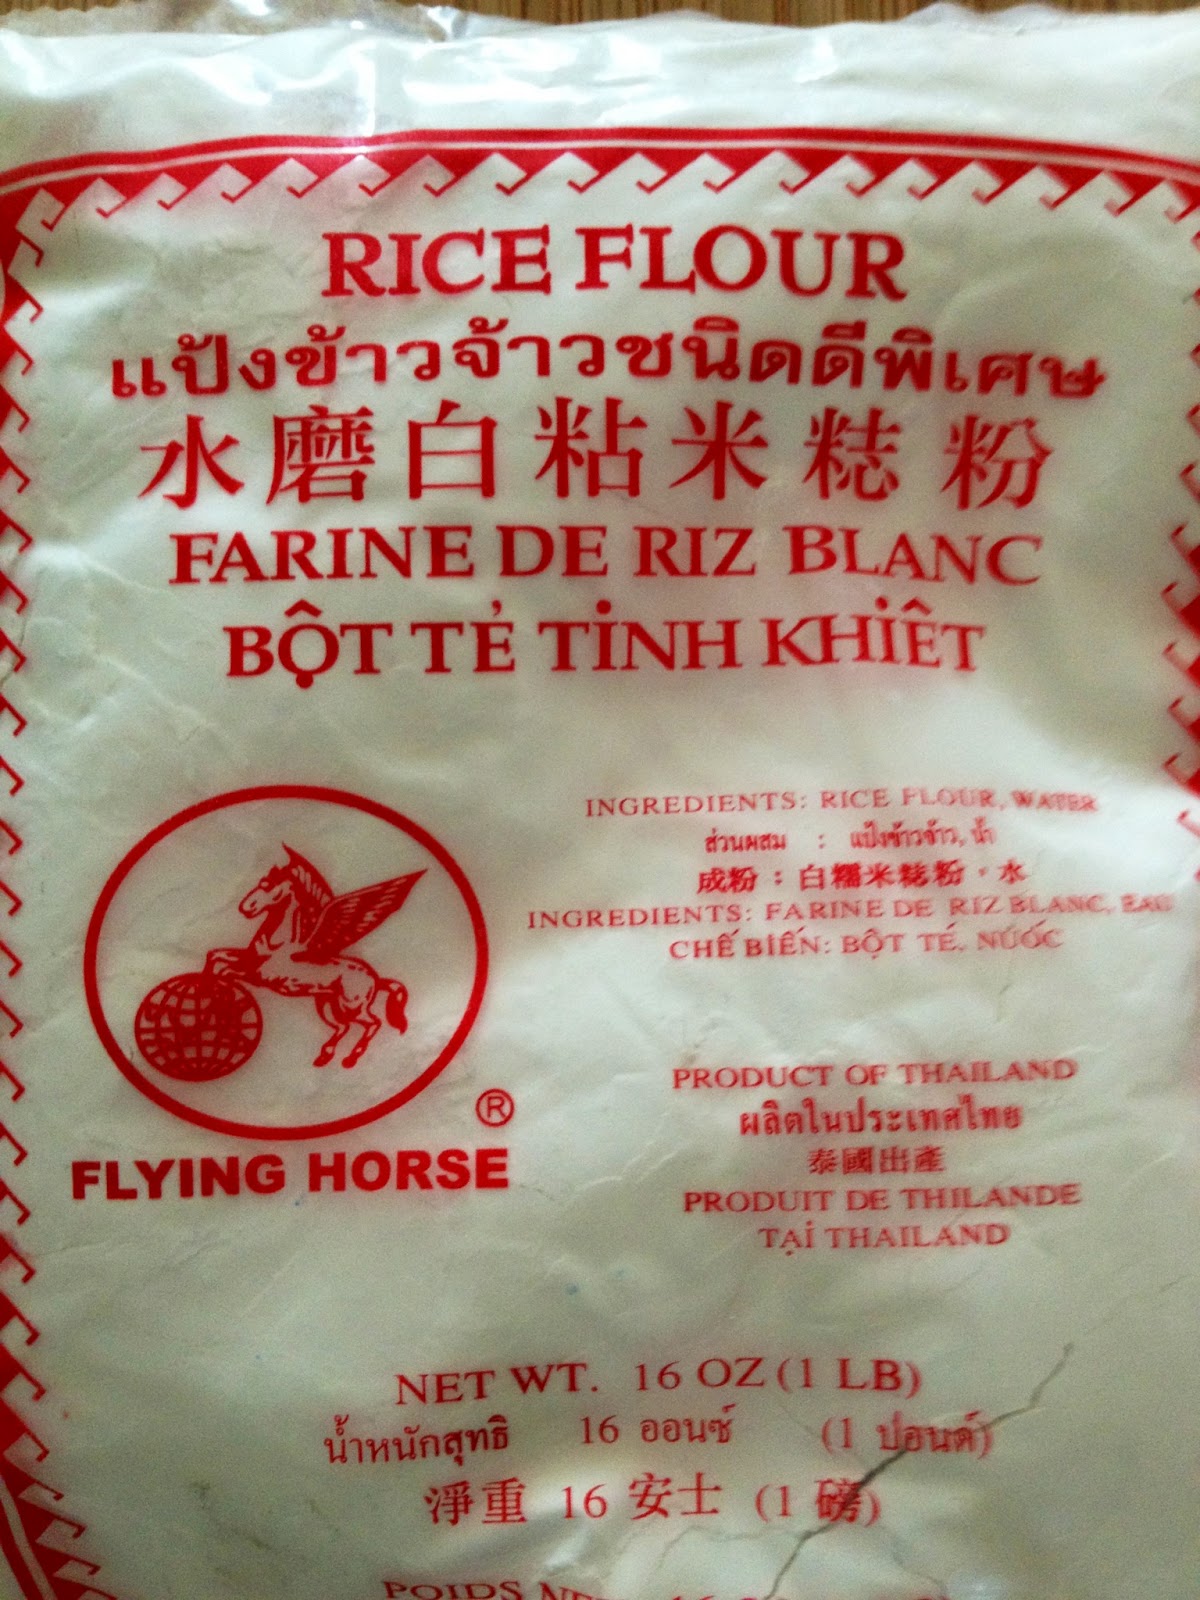
-1 3/4 cup gram/besan flour (chickpea flour). You can purchase this on my online Amazon store (link in the description box of this video) or any Indian grocery store.
-2 tablespoons white rice flour .
-1/4 teaspoon orange or yellow powder food coloring (you can use turmeric powder as an option).
-1 teaspoon salt (I use Kosher salt).
-1/4 teaspoon sage seeds (ajwain).
-1/2 teaspoon fenugreek leaves (methi).
-1/2 teaspoon cumin powder.
-1 1/2 teaspoon red chili powder.
-1/4 teaspoon garam masala.
-1 teaspoon coriander powder.
-1 tablespoon granulated sugar.
-1 tablespoon ginger-garlic paste (1 teaspoon ginger paste+ 1 teaspoon garlic paste).
-1/2 a bunch of cilantro (coriander leaves), roughly chopped.
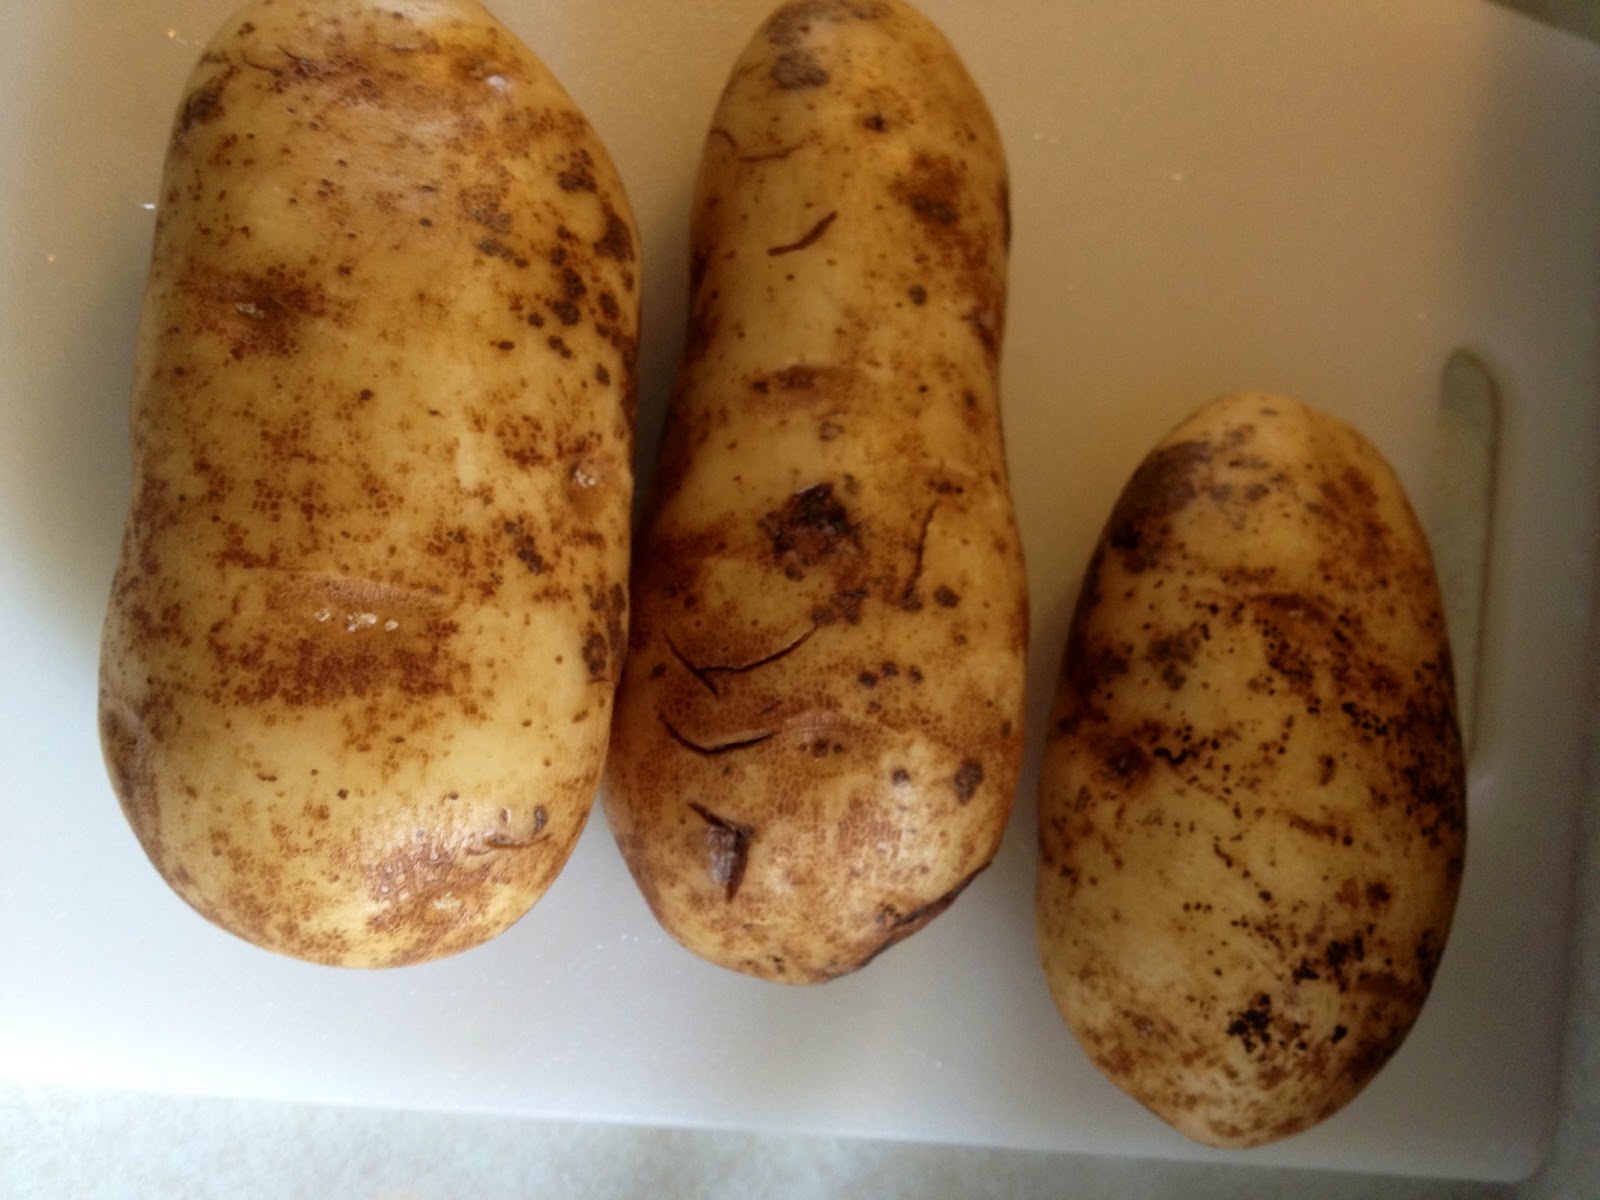
-3 large potatoes, thinly sliced using a sharp knife or mandolin slicer /9as shown in the video). I used russet potatoes for this recipe.


INSTRUCTIONS:
-In your wok or deep frying pan on medium heat, heat up the cooking oil.

-Clean your potato slices until the water runs clear (that will help get rid of some of the starch). Place them in the large bowl, immerse them in water and set aside.
-In the medium bowl, combine the rice flour, gram flour, salt, the cilantro, ginger-garlic paste and the spices. Use a whisk to combine the ingredients.
-Slowly pour in the water a little at a time. Whisk with each addition of water until the batter is thick and without any lumps. Your batter should coat the back of a spoon when dipped in. It should have the consistency of buttermilk pancake batter.

*** test your oil to see if its ready to fry by inserting the handle of a wooden cooking spoon into the hot oil. If bubbles form around the handle, then your oil is ready. Another way to test it to drop a small piece of potato into the hot oil. The potato should sit at the bottom of the pan for an 8-10 second count, then come up. If it stays down longer than 10 seconds, the oil is not hot enough. In which casem your bhajias will soak up that oil and will be raw inside. If it comes up before an 8 second count, the oil is too hot and the outside of your bhajia will be cooked, but the potato will be raw...eew!***
-Once your oil is ready,drain the potatoes and place them between two clean kitchen cloths. Gently pat them dry to remove any water. You want the potato slices dry or any excess water will water down your batter.

-Dip a handful of the potato slices into the batter. Make sure that both sides are well coated with the batter.

-Hold each slice up before you drop it into the hot oil, to remove any excess batter.
-Use your skimmer to move the bhajia around in the hot oil so that both sides are cooked (the skimmer is shown below).

-Once cooked, remove the bhajia out of the hot oil, let any excess oil drip back into the frying pan, and then transfer the bhajia to a container lined with paper towel to drain off more oil (if there's any exess ).
-Before you add another batch of coated, uncooked bhajia into the oil, allow the oil 2-3 minutes to come back to high temperature.


TIP: As you continue cooking, set your oven to warm and place the cooked bhajias in the oven to keep them warm until you have completed frying the whole batch.
Bhajias are best served warm with a cold drink. Coca Cola or Mango Nectar were made for this dish. I made a honey-tamarind sauce to dip them in. Soooo good!! Enjoy!